
Make a booking
This page allows you to make a new booking. Once a booking is made, a vehicle will be allocated on a random basis, taking into consideration any vehicle priorities that may have been assigned and any driver assignments.
On Desktop
From the booking’s menu, select New Booking and complete the booking form. The number of available vehicles will update based on the booking time and vehicle criteria. If the number of available vehicles is 0, please change the vehicle criteria or go to the Booking Manager screen to check vehicle availability.

Please note:
- Driver - if you have sufficient rights (depending on your User Role) you may choose to make a booking for another driver
- Charge Code - your default charge code is displayed. If you have sufficient access rights, you may change the charge code to be used for this booking
- Vehicle Group – you can select which vehicle group to book from if you have access to more than one group
- Notes - enter any notes that may be relevant to this booking. i.e. pick up Dr. Smith
- Occupants - enter the number of people that will be traveling.
- Vehicle Type - If a specific vehicle type is required, select this from the drop-down list.
- Accessories - If specific accessories are required, select the most important one of these from the drop-down list.
A confirmation of the booking will be displayed and can be printed. The booking will be allocated a unique booking number that may be used later to edit or cancel the booking, or to re-print the confirmation page if required. A confirmation email will be sent to your default email address, in which there is an ical attachment for you to load the booking to your outlook calendar.
The booking will be visible on your Home page where they can be edited and cancelled.
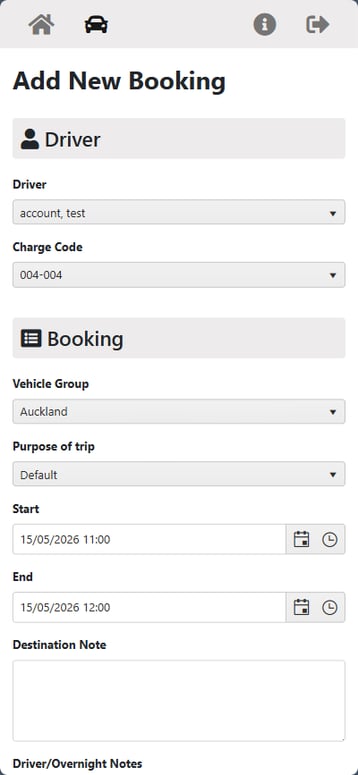
On Mobile Devices
On the mobile version of the booking system, tap the car icon at the top of the page to open the New Booking screen. You can then complete the booking using the same steps as on the desktop version.
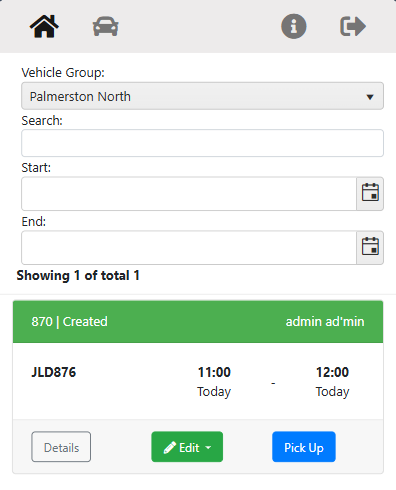
Once the booking is created, it will appear on the Home page, where it can be edited, picked up, or dropped off.
Features around making new bookings
Automatic or manual vehicle assignment - vehicle can be assigned to a booking automatically following a preconfigured logic, or manually based on use selection. For more details, see Vehicle Assignment Setting
Limit who can book a vehicle - vehicle can be dedicated to one or a group of drivers. For more details, see Assign Driver to Dedicated/Private Vehicles
Bookings that need approval - a booking approval flow can be initiated for certain types of bookings. For more details, see Booking Approval Function
Display estimated booking cost - estimated trip cost can be displayed in booking creation process. For more details, see Trip Cost Estimation Function